Tuesday 15 November 2011

The Writing Toolbar


Tutorial on how to use the Writing Tool Bar
Note: You may hide or show the writing tool bar by clicking on it.


Version 12 offers numerous enhanced writing supports to help our students, such as:
v    reorganized Write menu which allows for easier access to Draft and Brainstorm templates
v    A more comprehensive set of graphic organizer writing templates in Brainstorm format

The Writing Path Toolbar


On the writing path tool bar there are standard features that most are familiar with when it comes to formatting written documents. You can change the font style and size; you can underline, bold and italicize words titles etc. One of the best features on the writing path toolbar is the brainstorm feature which provides many graphic organizer templates. The brainstorm feature has a toolbar palette which is very user friendly for students and is similar to Kidspiration.
This tutorial will focus on three very useful features of the writing path toolbar. They are the brainstorming feature, the outline feature with split view, and drafting.


 When you open the Brainstorm window, a tools palette appears.
 
You can do the following:
  • Create Thoughts in different shapes.
  • Use Quick Takes to rapidly create Thoughts.
  • Link Thoughts.
  • Automatically Arrange Thoughts.
  • Add a Note to a Thought.
  • Change the properties of the shapes, font color, and color of the diagram background.
  

See video Using Brainstorm Tools

 
 Outline View

There may be times when you may want to see your written text outline in a graphic format. Because the Outline and Brainstorm are both views of the same Kurzweil 3000 text file, and share the same information, you can go back and forth between the text-based outline and the graphic organizer.    


To switch between Brainstorm and Outline view, do one of the following:
  • Select Brainstorm or Outline from the Write menu or from the Right Mouse Button menu.
  • Click Brainstorm or Outline button on the Writing toolbar.
  • Use the keyboard shortcut CTRL+SHIFT+T.
Switching to Split Screen view:
Once you have your outline, you’re ready to go to the draft stage in the writing process.
Click the Split Screen button in the Writing toolbar. A Split Screen window opens with the Outline in the left pane and the Draft in the right pane. If no Draft exists, the right pane is empty.


 When you open the Outline window, an Outline tools palette appears.


The palette allows you to:
  • Create topics or key ideas, sub-topics as well as supporting details.
  • Quickly re-organize the topics and sub-topics.
  • Switch from a variety of different prefix labels, such as Roman Numerals and Legal.
  • Add Notes to hold additional information and elaboration, such as quotes and source information.
 See video Using Outline Tools


Drafting


Creating a Blank Draft
  • This option is available whether or not you have already created a Brainstorm diagram or an outline using the Outline feature.
  • If a Brainstorm diagram and/or Outline exists, the Draft document opens in Split Screen view, with the outline in the left-hand pane, and the draft in the right-hand pane.
  • In the newly created draft, you can access the Writing Views – Brainstorm, Outline, and Split Screen views, and the Review checklist, as well as all writing and editing features.
To create a Blank Draft:
  • From the Write menu, select New Draft Blank.
  • From the Start Writing button in the Writing toolbar, select New Draft Blank.
  • Click the New button in the Main toolbar.

  See video Working with Draft and Split Screen View


The Green Bar - Study Skills


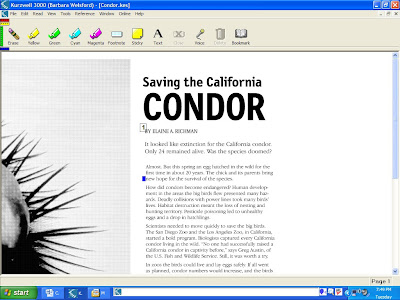
Open a document in Kurzweil. I selected the “Saving the California Condor document


Next, close all the other tool bars so that the study skill section is by itself.


To use highlighter materials, go to the desired colour pen and drag it to the words.


If you make a mistake, don’t worry. You can erase the highlighted words by selecting the erase icon (represented by an eraser at the end of a pencil).


Continue erasing…


Now for some cool features of Kurzweil that we can all use for our students.

Study notes allows a teacher to add information that may help a student have a better understanding of a concept.


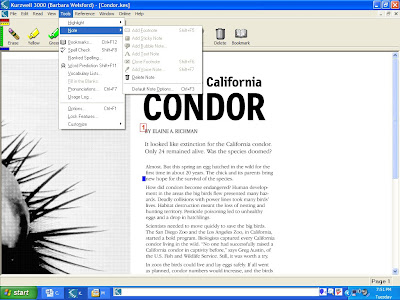
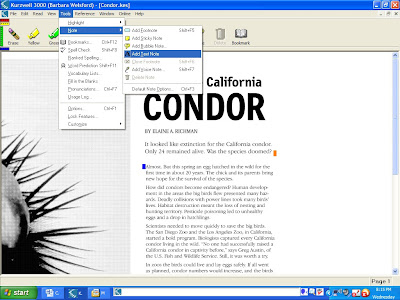
Go to the Tools on the main tool bar. Scroll down to “Note” and select “Add Footnote”.


You can enter your footnote into the area at the bottom of your screen.


The student will see the footnote icon.

The student can access the footnote by clicking on the icon


You can delete the footnote by clicking on the icon, returning to “Tools” , selecting “Notes” and then ”Delete footnote”.


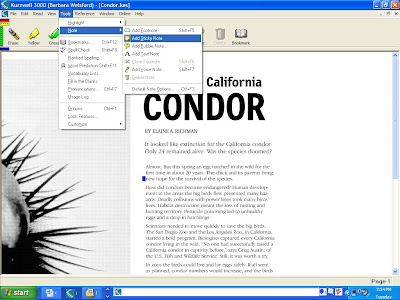
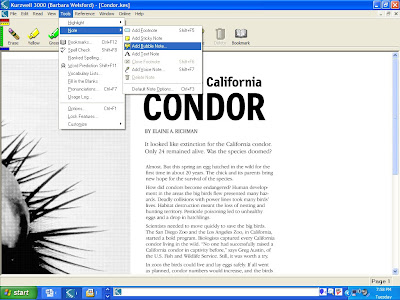
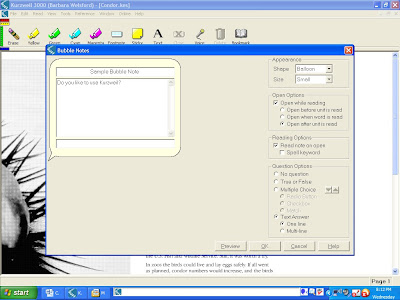
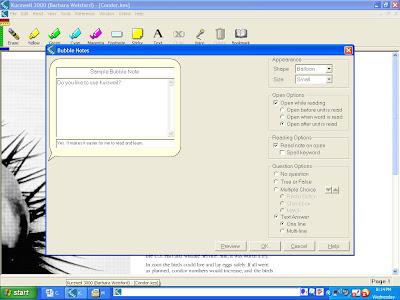
Features I particularly appreciate are “sticky” and “bubble” notes. To create, go back to “Tools” and “Note”, and then to “Add Sticky Note”.


You can add items such as questions to enrich understanding.


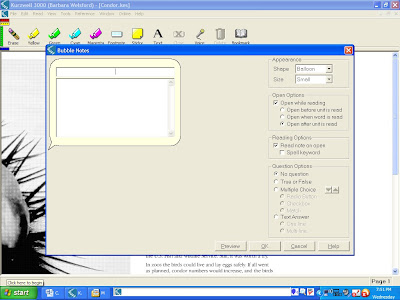
Or you could use a bubble note. The steps are the same as for the sticky note.


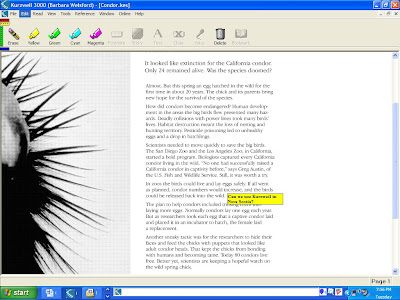
Bubble notes are useful since the student can also write in them. To illustrate, I created a sticky note for s student to demonstrate his or her understanding of a concept.


When the student reads the text, a bubble note will appear with the question and a space for the answer.


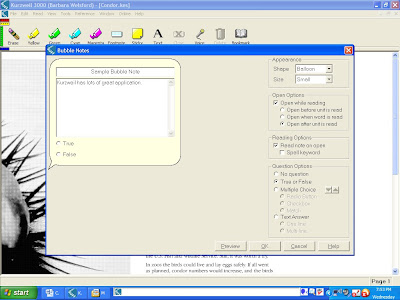
A teacher could use bubble notes for true/false questions.


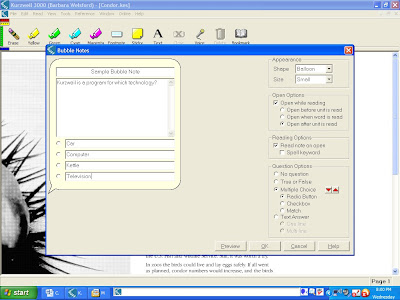
A teacher could also use Kurzweil to give students multiple choice questions.


A bubble note has the addition function of permitting a teacher to ask a student to write a sentence or two while reading the text.


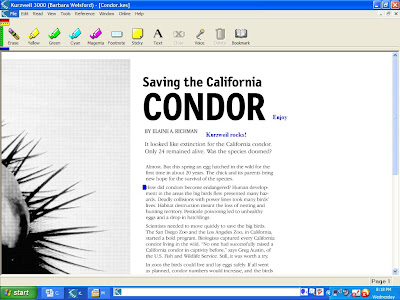
A teacher may want to write a note or two for a student that is pasted on the text. Go to the "tools", "note". then "text note".


The student will see the note as he or she reads the text.


Hope you have lots of success as you venture into the power of Kurzweil!

Main Toolbar

Main Toolbar

Open/ Save Documents and files that you create, import and work with in Kurzweil 3000 are stored in*:
Windows Vista, Windows 7
C:\Users\user name\Documents\KESI\Kurzweil 3000
Windows XP
C:\Documents and Settings\username\My Documents\KESI\Kurzweil 3000
Older systems
C:\My Documents\Kurzweil Educational SystemsI\Kurzweil 3000\username
USB
USB Documents folder on the USB drive.
If you want to save directly to the computer's hard drive, save the file to the Desktop, then move it to wherever you like. WARNING: If you choose another place on the hard drive, Kurzweil 3000 USB saves the file temporarily and will remove it permanently when you exit the USB product.
Audio output files, by default, are saved to the Output Audio folder on the USB drive, but are savable to the Documents folder on your hard drive.


ScanTo create a new scan document:
1.     From the File menu, point to New, and then choose Image File.

A blank image document appears with the
There are no scanned images in this file.
To add an image, press the Scan button.
2.     Click the Scan button in the Main toolbar.
As you scan more pages, Kurzweil 3000 automatically adds them to the end of your document. After recognition is complete, you can start reading by clicking the Read button on the toolbar.
Other ways to scan:
Press the F9 key on the keyboard.
Press CTRL + ALT + S, even if you are working in a different program.


Web
When you use Kurzweil 3000 to read Web sites, you view the site in either Microsoft Internet Explorer or Mozilla Firefox as usual. When you click the Read button in the Kurzweil 3000 Web toolbar, however, Kurzweil 3000 reads the text of the site aloud as dual highlighting tracks the reading. You can also use Kurzweil 3000 Reference tools while reading Web sites.
To access the Web through Kurzweil 3000:
Click the Read the Web button in the Main toolbar.

The Internet browser that you selected in the Reading Options pane for Read the Web (Internet Explorer or Firefox) appears on your screen. You'll also see a Kurzweil 3000 Web toolbar. If you are using Internet Explorer, the Read the Web toolbar appears along the bottom of your monitor. If you are using Firefox, the Read the Web toolbar is integrated into the browser's toolbar area.
Internet Explorer Read the Web toolbar:


Mozilla Firefox Read the Web toolbar:


You can hide the Kurzweil 3000 Firefox Read the Web toolbar by right-clicking on the Read the Web toolbar and deselecting KESI Reader Toolbar. To redisplay the toolbar, right-click in the Firefox menu bar, and select KESI Reader Toolbar.
Notes:
·         Kurzweil 3000 always favors the use of the Mozilla Firefox browser. If it detects Firefox on your computer and you haven’t selected a default browser as discussed in About Selecting a Default Browser for Read the Web, Kurzweil 3000 will prompt you to install the KESIReader extension as detailed in Installing the KESIReader Firefox Extension.
·         Once you install the KESIReader Firefox extension, Firefox displays the Read the Web toolbar, regardless of whether or not Kurzweil 3000 is running. If you are in Firefox and you want to launch Kurzweil 3000, click the Read/Pause button on the Read the Web toolbar.
·         Programs that suppress Web site "popups," sometimes known as "popup killers," should be disabled, as they can interfere with Kurzweil 3000 Web interactions.

Back /Forward
1.      To move through the text quickly the Back & Forward buttons can be used.
2.      By clicking on the Forward button the program stops reading and jumps to the next line. To go back to the previous line, simply press the Back button.
3.      Once the curser is at the desired place, click on the read button to resume.
Read
To start or stop reading:
1.     Make sure there is a document in the Kurzweil 3000 window. This can be a document you opened, or one you just scanned or typed.
2.     Click the Read button on the toolbar to start reading. The Read button changes to a Pause button. Click the Pause button to stop reading. You can click anywhere in the document and start reading again.


3.     or
4.     On the Read menu, choose Start Reading to start reading, or Pause Reading to stop reading.
After you have stopped reading, you can begin reading again by clicking the Read button on the toolbar or choosing Start Reading from the Read menu.

Audible
To highlight each unit in a document without reading aloud:
Click the Audible button on the toolbar. The Audible button changes to a Silent button.

or
Open the Read menu and choose Silent Reading.
To read out loud again, click the Silent button, or open the Read menu and choose Silent Reading again.

Translate
Use this feature for quick and easy translation of excerpts or passages of text in one language to another.
This feature requires Internet connection.


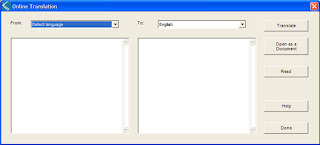
To translate text, use the Translate button, 
1.     Do one of the following:
Select text in an open document, then click the Translate button.
Or click the Translate button, then type text into the Translation dialog.


2.     In the Translation dialog, do the following:
In the From list, select the language of the text you want to translate. Leave the option on Detect Language and Kurzweil 3000 selects the language for you.
In the To list, select the language you want the text translated to.
4.     If you are typing text for translation, click in the left-hand text box and enter the text. If you had selected text in a document, that text would appear here.
5.     Click Translate.
6.     To read the translation, click Read.
7.     To open the translation in a Kurzweil 3000 document and reuse the translated text, click Open in a Document button.  A Kurzweil 3000 text document opens containing the translated text. You can read and reuse the text.

Picture Dictionary
Kurzweil 3000 supports picture dictionary software from other companies such as Mayer-Johnson (http://www.mayer-johnson.com/) as well as clip art or image libraries.  It is possible to set up multiple picture dictionaries to be accessed from within Kurzweil 3000.
To add a Picture Dictionary:
1. Be sure that the picture dictionary software (or clip art or images) is installed on your system, and you know its location. Most programs are installed on your main hard drive (e.g., C:\).
2. Start up Kurzweil 3000.
3. From the Reference / Select Dictionary / Picture Dictionary / Setup menus, open the Picture
Dictionaries dialog box and click New. 
4. In the New Picture Dictionary dialog, find and double-click the name of the folder that contains the actual images.
5. To switch to a different drive, select the desired drive from the Drives list.
6. If you do not want to include subfolders, click the Include subfolders checkbox to deselect the option.
7. Click in the Name box and type the desired name for this new picture dictionary addition.
8. Click OK, then click OK again.

Definition
By putting the curser at the beginning of a word and selecting the dictionary option a user can access a definition for that word. Note: For use by students, the American Heritage Children’s Dictionary should be selected.  To do this, select the Reference option. Then, Select Dictionary. You will then be given a list of possible dictionaries.
Synonym
The synonym option allows the user to quickly identify other words that have the same meaning. This can help students gain a better understanding of the text as well as develop their writing.
Pronounce
This option allows a user to hear a single word pronounced. Simply highlight the desired word and select the pronounce option.
Syllables –
Users can select the Syllables option to hear a word pronounced syllabically, to see it  broken into syllables, and  to see its phonetic spelling. Simply highlight the word and select the option.
Spell –
The Spell option will orally spell a word for users.
Help –
The Help option is a great resource for users, to get detailed information on the many functions of the Kurzweil program.
Extract
The Extract option allows users to highlight pieces of information and to extract them to make a new file. This is a great way for students to show their comprehension, without the need for them to pick up a pen and put it to paper.
File join
This option allows users to join two documents into one.
Send to
By selecting this option users can quickly and easily send their file to another person. This is a great feature for students to pass in finished work to teachers.
Audio Files
Kurzweil 3000 lets you save text and image documents as either MP3 or WAV audio files.
You can listen to documents saved as audio files with either portable MP3 players or software that supports these formats. The output file can contain either all or portions of the selected document.


Tuesday 8 November 2011

Kurzweil 101

Introduction--What is Kurzweil 3000?

Kurzweil 3000 is a scanning, reading, writing and learning solution for students with learning disabilities or reading difficulties. It is/has....

  • A program anchored upon the principles of Universal Design for Learning (UDL). UDL is defined by Kurzweil as "the design of products and environments to be used by all people to the                                                                                    greatest extent possible, without the need for adaptation or specialized design."
  • Support for all Response to Intervention (RtI) tiers of instruction
  • The ability to differentiate instruction without differentiating curriculum
  • Access to all major digital file formats and printed materials
  • A single user interface containing all the tools necessary for academic success
  • Support for reading, vocabulary, comprehension, writing, study skills, and test-taking
  • Tools for research-based study skills and writing strategies
  • A platform for whole class, small group, or individual instruction
Learning About Kurzweil 3000


What Can Kurzweil 3000 Do?- An Overview


How  a Middle School Uses Kurzweil 3000
Although this program was originally designed for students with learning, difficulties, this video shows how all students can benefit by using Kurzweil.


READING WITH KURZWEIL
1. Click inside an open document.

2. In the Main toolbar, click:
 to Start Reading.


   to Pause Reading.

 
 then to Read previous reading unit.

 
then to Read next reading unit.

 
 to switch between Reading audibly or silently.


TO SELECT A READING UNIT

Click the Reading Unit box (the third box in the reading toolbar) and select the unit you want.


or

Open the Read menu, choose Read Unit, and then select the unit you want. You can choose Word, Phrase, Line, Sentence, Paragraph, Heading, or Highlight.


As Kurzweil 3000 reads, it highlights the current unit. You can pause after each unit, or read continuously.


SNAPSHOP OF THE READING TOOLBAR


Reading Voice-Choose the voice you want (Wide range including grandma and grandpa)

Reading Mode-Specify how you want Kurzweil 3000 to read. (Continuous, Self Pace, Word by Word)

Reading Unit-Specify how much text you would like Kurzweil to read. (Word, Phrase, Line, Sentence, Heading or Highlighted Text)

Reading Speed-Specify the speed with which you want to read. (Optimun-145-150)

Zoom Level-Enlarge or reduce the view. (80%-500%)

Page-Go forward/backward a page or specify the page number to go to.

Page Thumbnail-Show page thumbnail and use the arrows to move to sections on the page.

Thumbnail View-Show all page thumbnails in the document. Click the thumbnail of the page you.

Kurzweil 3000: Change Reading Options Video


To Set Reading Options:

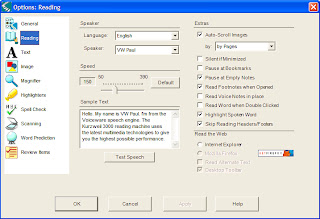
1.    From the Tools menu, select Options to display the Options dialog box.

2.    Click the Reading icon on the left to display the Reading Options pane.


ADDITIONAL READING OPTIONS

Looking Up a Selected Word-Select a word in a document, then click the desired reference

Magnify Spoken Word- Display the current word being read in a separate magnifier window.

Language List- You can select other reading languages.

Speaker List- You can change reading voices.

Pause at Empty Notes- Use in conjunction with Text Notes in Fill in the Blanks tests.

Highlight Spoken Word- Highlight or not highlight words as Kurzweil 3000 reads.


THE EXTRAS

The Extras area lets you choose additional reading features:Auto-Scroll Images-Enables or disables image scrolling during reading. You can choose to scroll by line or by page.


Silent if Minimized-Causes Kurzweil 3000 to stop reading if you minimize the window.


Pause at Bookmarks-Causes Kurzweil 3000 to pause at each Bookmark while reading.


Pause at Empty Notes-Causes Kurzweil 3000 to pause at each empty Text Note while reading.


Read Footnotes When Opened-Lets you hear Footnotes read out loud as soon as they are opened. You do not need to click the Read button.


Read Voice Notes in place-Causes Kurzweil 3000 to read/play Voice Notes as it encounters them.


Read Word When Double-Clicked-Causes Kurzweil 3000 to read a word when you double-click on it. This works even when Silent Reading is selected in the Read menu.


Highlight Spoken Word-Causes Kurzweil 3000 to highlight the current word within a unit during reading.


Skip Reading Headers/Footers-Directs Kurzweil 3000 to not read text in areas that have been marked using the Header/Footer Editor.


THE READING TOOLBAR VIDEO DEMONSTRATION